Off-road engine building 101

Wrenching and Technical Information

Moderator: Club Officers

Post Reply
User avatar
VerticalTRX
Club President
Posts: 758
Joined: Wed Oct 26, 2005 12:51 pm
Location: Southwest VA
Contact:

Off-road engine building 101

Post by VerticalTRX »

Yall asked for engine tech, so here it is. :beer:

I've got the following engine projects going on right now:
-top end upgrades to the 351w in my '79
-complete rebuild of a 2.3L Ford in my brothers CJ-2a
-complete rebuild of the L134 flathead in my CJ-3a
-minimum of a head gasket job, maybe a full rebuild of the 3.4L in my '97 4runner


So there can be plenty of pics and tech I can post as I work through these projects. Let me also say, I am by no means an expert in this subject, but I've been tinkering with motors in the off-road world for a few years now and have learned quite a bit. Terry also knows volumes on the subject of motor building and hopefully he will be adding to this thread as well (any of yall feel free to add tech also, I'm still learning everyday myself)


One thing I have discovered is there is very little tech info in books, on the web, or even from the companies that make the parts about building motors for off-roading. This became painfully obvious when I was talking to all the cam company tech lines a few weeks back and discussing my needs for a cam for my '79. Their specialty is drag racing, hot street/strip motors, etc, not chugging along through the woods at 500rpms.

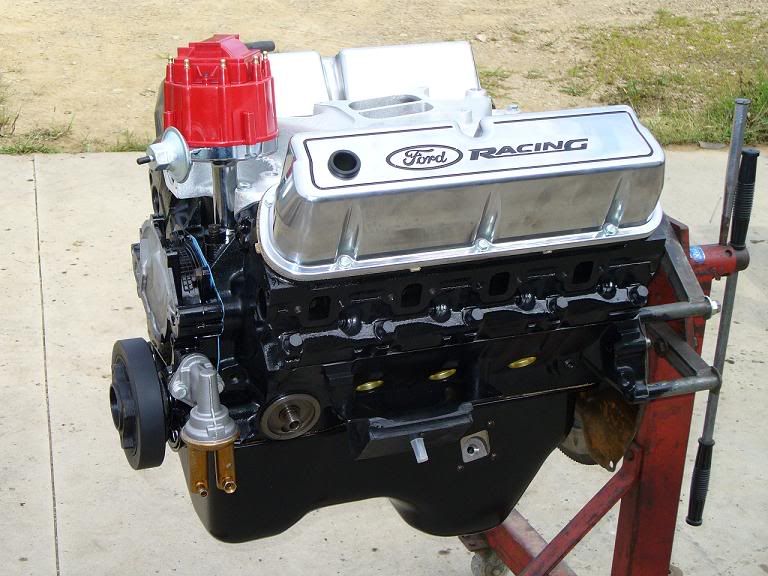
Pic of the 363" Windsor that's in my '79, when it was freshly built:
Image


The first step to any engine buildup is planning, so we'll start there. The type of wheeling we do (a mix of slow speed trails/crawling, combined with some high rpm hill-climbs and mudding) requires lots of low end torque, fast throttle response, and enough mid-range/top end power to really spool up the tires when needed. Generally we're looking to make power in the idle to 5000rpm range with a nice flat torque curve. To make that happen takes decent compression and good air flow (port velocity) at low to mid rpms.


I could write a bunch of boring stuff here about all the theory behind this, but instead I'll just give an example 'recipe' and we can discuss more of the specifics later:

Small-block V8 ~350-360ci Ford, Chevy, Mopar take your pick.
-9 to 9.5:1 compression ratio
-Stock iron heads with some port and bowl work, maybe a good 3-angle valve job, or aftermarket heads in the 160-180cc range (a lot of variables in the heads, we'll discuss that later)
-Low-end or "RV" style cam, about 204/214 duration at .050, about .450 lift, with straight up timing set
-Edelbrock Performer dual plane intake
-600cfm 4 barrel carb (or perferably a Q-jet) or fuel injection
-1 1/2" to 1 5/8" primary headers, shorty or full length
-free flowing 2.5" dual or 3" single exhaust

The above combo should make a dyno graph that looks something like this (this is just a desktop dyno generated graph, may or may not equate to real life numbers):
Image

Boat loads of low end torque pulling all the way through mid range, and hp peaking around 4500.This is very close to the way the motor in my '79 acts and my current build specs are very similar.

363ci Windsor (351w bored .060" over)
-9.25:1 hyperutectic pistons
-stock crank and rods, reconditioned with all ARP chromoly fasteners
-E7TE casting iron heads, with a good bowl blending and mild port work
-Edelbrock Performer Plus 2182 cam, 204/214 duration at .050, .448/.472 lift
-Edelbrock Performer dual-plane intake
-Quadrajet carburetor
-Shorty headers
-3" single exhaust with good flowing muffler
-GM HEI ignition


This motor pulls hard all the way down to about 400rpms on the bottom end and up to about 4500 on the top. With my current cam It'll turn 5500, but it's not making much power that high and that's nearing valve float. Plenty of torque for most any crawling and enough power to spin Q78 swampers in third gear low range on the hill climbs. Also, smokes the tires all the way through first, second, and part way through third on the street, but we won't talk about that ;)

I'm hoping to get it on the dyno soon so I can see what it's actually making.

Right now I'm mostly discussing standard V8 carb'd application because their common, cheap and easy to build, and mostly what I deal with. Also note that all the basics apply whether you have a 4, 6, or 8 cylinder, carb or fuel injection. Increasing compression, proper camshaft and good flowing head(s) is always a good start for performance. I'll try to post up some of the specifics on compression ratios, cams, intakes, heads and carbs and what works for our uses very soon.
'79 F-150
'49 CJ-3A
User avatar
redneckrapunzel
Posts: 572
Joined: Wed Oct 01, 2014 10:48 am

Re: Off-road engine building 101

Post by redneckrapunzel »

This could be a stupid questions but....


So looking at your build it seems more like a HP build than a torque build because of the high flow aspects, But as you say in your post to get a nice flat torque curve you need port velocity. So do you overcome this with the high lift cams or is the Edelbrock intake a small port high flow intake? For example the 400 in gus's bronco runs a sp2p (think that's the name for the stock intake) intake off a 302 to drive those velocities way up and just like yours that motor dies at like 4k I don't think its ever been above 4k more than 3 or 4 times in its life. Previous owner did some crazy stuff with that motor to get it to make crazy torque.
Last edited by redneckrapunzel on Tue Sep 27, 2016 9:42 am, edited 1 time in total.
1997 TJ
04 superduty
10 civic #nolifelikethelowlife

"If you'd stop flirting with the :sheila: and worked, you'd be almost done." - alec

^ very true ^
User avatar
TerryD
Posts: 1905
Joined: Mon Sep 04, 2006 7:57 pm
Location: Covington, Va
Contact:

Re: Off-road engine building 101

Post by TerryD »

VerticalTRX wrote: Small-block V8 ~350-360ci Ford, Chevy, Mopar take your pick.
-9 to 9.5:1 compression ratio
-Stock iron heads with some port and bowl work, maybe a good 3-angle valve job, or aftermarket heads in the 160-180cc range (a lot of variables in the heads, we'll discuss that later)
-Low-end or "RV" style cam, about 204/214 duration at .050, about .450 lift, with straight up timing set
-Edelbrock Performer dual plane intake
-600cfm 4 barrel carb (or perferably a Q-jet) or fuel injection
-1 1/2" to 1 5/8" primary headers, shorty or full length
-free flowing 2.5" dual or 3" single exhaust

Couple points:
1: The 160-180cc Gurbb is talking about is intake runner size, not combustion chamber volume. Stock Chevy "smog" heads work very good and are around 160cc intake runner size with 1.94/1.50 valves stock. That's what's on my Blazer and in my 7000 RPM turning Camaro engine, but with LOTS of port work and 1.60 exhaust valves. I like the 76cc chambers because they don't shroud the valve. If you notice on later engines, the valves are unshrouded and they use a flatter deck to up the compression ratio rather than the older heads that just have poorly shaped combustion chambers that prevent clean flow around the valve.

2: Q-Jets are rated at 750 CFM, but are self adjusting to what the engine needs to run. The small primaries help promote bottom end torque and throttle response with higher signal to the boosters. If you insist on a Holley (or God forbid, an Edelcrock), plan on less throttle response due to the almost identical primary and secondary sizes that were designed for racing engines (Edelbrock= :lol2: ) that prevent a good booster signal at lower engine speeds.

3: For street engines, the gains of long tube headers are rarely worth the hassle of making them clear in an off-road vehicle. Especially for something with a full exhaust system.


redneckrapunzel wrote:This could be a stupid questions but....


So looking at your build it seems more like a HP build than a torque build because of the high flow aspects, But as you say in your post to get a nice flat torque curve you need port velocity. So do you overcome this with the high lift cams or is the Edelbrock intake a small port high flow intake? For example the 400 in gus's bronco runs a s2p2 (think that's the name for the stock intake) intake off a 302 to drive those velocities way up and just like yours that motor dies at like 4k I don't think its ever been above 4k more than 3 or 4 times in its life. Previous owner did some crazy stuff with that motor to get it to make crazy torque.
160-180cc intake runners are a pretty standard size for lower RPM torque. On a 400, you have more CID and larger runners are still providing good port velocity and good cylinder fill. His engine dieing off has some more to do with cam selection and possibly head choices. I'm assuming this is a 400/351M engine family? These are not bad heads for HIGH rpm use. 2.02/1.60 valves (what GM used in the old Corvette heads) with huge runners and chambers. The odd angle of entry into the cylinder with the intake valve and the exhaust runners are odd on them but the potential is there. We actually discussed using a set on Grubb's 363 (?) at one point when the heads he wanted were in short supply.
Terry
Offroading: The hobby of turning perfectly good vehicles into scrap metal. :cool:
User avatar
VerticalTRX
Club President
Posts: 758
Joined: Wed Oct 26, 2005 12:51 pm
Location: Southwest VA
Contact:

Re: Off-road engine building 101

Post by VerticalTRX »

redneckrapunzel wrote:This could be a stupid questions but....


So looking at your build it seems more like a HP build than a torque build because of the high flow aspects, But as you say in your post to get a nice flat torque curve you need port velocity. So do you overcome this with the high lift cams or is the Edelbrock intake a small port high flow intake? For example the 400 in gus's bronco runs a sp2p (think that's the name for the stock intake) intake off a 302 to drive those velocities way up and just like yours that motor dies at like 4k I don't think its ever been above 4k more than 3 or 4 times in its life. Previous owner did some crazy stuff with that motor to get it to make crazy torque.
Terry pretty much covered it, but basically all of the components I'm running are designed for the idle to 5000 rpm range. By hot rodders standards my 204/214 duration cam is tiny and these stock Ford heads flow pitiful numbers at the top end. BUT, that makes for tremendous port velocity in the low RPM ranges and therefore lots of low end torque. The ultimate goal is to get lots of top end HP but without sacrificing low end torque. The problem is, with a naturally aspirated engine (especially with a flat tappet cam) you generally only have about a 4000 rpm range where you are really making big power. Changing the cam and heads can move the peak power up or down in the RPM range, but it takes some doing to really broaden the power curve at both ends. Horsepower is merely a calculated number based on torque vs RPM, so a motor that is peaking at 400hp at 5200rpms is still only making 400lb-ft, just like my 250-300hp motor. The difference is the power has been moved up in the RPM range, which takes a longer duration cam and better flowing heads. I'll be doing some experimenting in the future with different heads and maybe a roller cam to see if I can keep around 400lb-ft at idle but push the RPM and HP up.

Dynamic compression is also at play here, a short duration cam makes lots of dynamic compression at low RPMs. More compression makes a bigger bang when the cylinder fires and therefore more power. You have to watch cylinder pressures when you run a real short duration cam with high static compression ratios. That varies motor to motor, but I wouldn't feel comfortable running over 10:1 CR with the cam I have. I'm already at 190psi cylinder pressure, push it over 200psi and your asking for detonation troubles on pump gas.

One last thing, the goal is to increase airflow volume and speed at all RPMs and there are a few things we can do to help that. Even with stock heads, you can see noticeable increases in flow without making the ports bigger or adding bigger valves. Blending the valve seat to bowl area, blending around the valve guides, smoothing and softening the short side radius on the ports and removing the push rod humps will all help flowing across the board, basically you're making the heads more efficient. I'm working on porting a set of heads right now, so look for some info on that in the near future.
'79 F-150
'49 CJ-3A
User avatar
BadAssEddie
Posts: 2635
Joined: Sun Sep 27, 2009 11:12 pm
Location: The Woods

Re: Off-road engine building 101

Post by BadAssEddie »

VerticalTRX wrote:-free flowing 2.5" dual or 3" single exhaust
What are your thoughts and experiences with the whole backpressure/scavenging/escape velocity aspect of exhaust systems on N/A gas motors?

Would you oversize an exhaust to allow for power down the road? I am planning the exhaust on Alison's 78 and am undecided on whether to do single 2.5", dual 2" with Xpipe, dual 2.5" with Xpipe, 2.5" two into one muffler, etc. How is your truck setup and do you think a stock FE will do okay with an exhaust sized for a not stock FE (intake, cam, 4 barrel, and a compression bump is about the extent of it). In my experience, as long as the exhaust was suffiecently long and had a muffler, low rpm torque didn't seem to fall off according to my butt dyno as opposed to when it was short and open, so I am hoping it won't be of much consequence (two exhausts on Bronco and two on K5).
1969 Cadillac Deville 7.7 Big Block
1978 Ford F-150 6.4 FE
1993 Ford Bronco 5.8 Windsor
1994 Ford F-250 7.3 Powerstroke
2016 Ford F-250 6.7 Powerstroke
User avatar
VerticalTRX
Club President
Posts: 758
Joined: Wed Oct 26, 2005 12:51 pm
Location: Southwest VA
Contact:

Re: Off-road engine building 101

Post by VerticalTRX »

BadAssEddie wrote:
VerticalTRX wrote:-free flowing 2.5" dual or 3" single exhaust
What are your thoughts and experiences with the whole backpressure/scavenging/escape velocity aspect of exhaust systems on N/A gas motors?

Would you oversize an exhaust to allow for power down the road? I am planning the exhaust on Alison's 78 and am undecided on whether to do single 2.5", dual 2" with Xpipe, dual 2.5" with Xpipe, 2.5" two into one muffler, etc. How is your truck setup and do you think a stock FE will do okay with an exhaust sized for a not stock FE (intake, cam, 4 barrel, and a compression bump is about the extent of it). In my experience, as long as the exhaust was suffiecently long and had a muffler, low rpm torque didn't seem to fall off according to my butt dyno as opposed to when it was short and open, so I am hoping it won't be of much consequence (two exhausts on Bronco and two on K5).
I actually just upgraded the exhaust on my '79 from a single 2.5" to a single 3". The old exhaust was way too small and a real cork in the system. My current exhaust setup: Shorty headers into 2.5" y-pipe, into 3" single exhaust with a Dynomax Super Turbo muffler, dumping out under the truck at the rear axle. My old single 2.5" Flowmaster only flowed about 450 cfm according to the data I found and the new 3" Dynomax flows about 700cfm. It also sounds a lot better, much deeper, more authoritative and not much louder (and more power.)


Honestly I'm not sold on the whole 'a motor needs back pressure' argument to make power. When I was running with just the headers into the crossover pipe it ran better and with more power at all RPMs. I've read that after the first roughly 36" of exhaust (starting at the heads) the motor really doesn't care what the exhaust is as long as it has plenty of flow. That said, exhaust tube sizing of the headers is important, too big will reduce flow, scavenging, and low end torque. Most small blocks for our intended uses will be well served with a 1 1/2" or 1 5/8" primary tube diameter, get up into the big block range and 1 3/4" becomes more appropriate.

As for a 360 or 390 FE, I think a 3" single or 2.5" dual would be just fine for either a stock or slightly built motor. If you go dual you should plan on running a cross-over pipe of some sort, which can be kind of tricky on a 4wd. By the flow numbers you could run a 2.25" dual system, maybe even a 2", but on these trucks the smaller pipe gives it a real 'pop pop' sound I personally don't like. Step up to 2.5" dual with the right mufflers and an H-pipe and its much smoother and better sounding. A single 3" accomplishes the same thing, but with less weight, easier to package, and cheaper.
'79 F-150
'49 CJ-3A
User avatar
TerryD
Posts: 1905
Joined: Mon Sep 04, 2006 7:57 pm
Location: Covington, Va
Contact:

Re: Off-road engine building 101

Post by TerryD »

There are different points if view on exhaust but back pressure is a misunderstanding of scavenging. A cylinder, post ignition, vented to atmosphere will mostly empty. Scavenging is the effect of contraction of the hot exhaust in a thin header that sheds heat, creating a vacuum as it exits as well as a pulling effect from the high speed gases still trying to move forward in the exhaust system as the piston reaches top dead center that helps clear the chamber.

There are entire threads and calculators to help you approach the most effective exhaust system but most of those are wide open throttle and top rpm based. There is a formula as well for pipe diameter for displacement at rpm that will get you in the ballpark. Nothing beats tuned length zoomies at WOT. But we're not trying to set record 1/4 mile times or fast laps at Richmond International either.

Perspective is key. Know what you want to accomplish and approach it with common sense. Yeah, there's probably 3-5hp in that months worth to calculations, but as soon as you drop 1000' in elevation, or 20*F ambient temperature or even switch from Citgo to Exxon, a lot of that can go out the window.

Typically a 2.5"-3" single system (based on cfm calculated from displacement) will do the trick. Tune it where you'll be using it. If you only ever idle around or turn max rpm between shifts, there's no reason to model you're engine to work best there. You're never there to use it.
Terry
Offroading: The hobby of turning perfectly good vehicles into scrap metal. :cool:
User avatar
BadAssEddie
Posts: 2635
Joined: Sun Sep 27, 2009 11:12 pm
Location: The Woods

Re: Off-road engine building 101

Post by BadAssEddie »

VerticalTRX wrote: -complete rebuild of a 2.3L Ford in my brothers CJ-2a
-complete rebuild of the L134 flathead in my CJ-3a
-minimum of a head gasket job, maybe a full rebuild of the 3.4L in my '97 4runner
Got anywhere on the other rebuilds (especially the flathead??)
1969 Cadillac Deville 7.7 Big Block
1978 Ford F-150 6.4 FE
1993 Ford Bronco 5.8 Windsor
1994 Ford F-250 7.3 Powerstroke
2016 Ford F-250 6.7 Powerstroke
User avatar
VerticalTRX
Club President
Posts: 758
Joined: Wed Oct 26, 2005 12:51 pm
Location: Southwest VA
Contact:

Re: Off-road engine building 101

Post by VerticalTRX »

BadAssEddie wrote: Got anywhere on the other rebuilds (especially the flathead??)
Indeed, we got the 2.3L ford in my brothers CJ2a done back in September or October, and I'm just buttoning up the L134 in my CJ3a now. I also finished up a few odds and ends projects on the '79. I have a ton of pics I took, trying to sort through them and figure out the best way to post all this. I might just do a few narrated slide show youtube videos on the rebuild, haven't decided yet.
'79 F-150
'49 CJ-3A
User avatar
VerticalTRX
Club President
Posts: 758
Joined: Wed Oct 26, 2005 12:51 pm
Location: Southwest VA
Contact:

Re: Off-road engine building 101

Post by VerticalTRX »

Just pulled the 351w out of the ‘79 for a freshen up so I thought I’d update this thread with a few things I’ve learned. Terry and I built the original motor almost 15 yrs ago and it has 11,000mi on it, much of those are off-road miles and horrible abuse. The motor still had 190psi of compression on all cylinders, ran great and was leak free, but began loosing oil pressure under load which is a telltale sign of bad main bearings. Upon disassembly I found several of the main bearings down to copper, some metal transfer on the rod bearings, and light scuffing on the cylinder walls, all signs of oil starvation. My conclusion is that the stock pan and oil pickup were occasionally pulling air at extreme angles and possibly the crank was aerating the oil on steep high rpm hill climbs.

When we originally built this motor in ‘06 my shoestring budget was calling the shots on the parts we used. While I’m still trying to get the most bang for my buck, this time around I’ll be using better heads, a different cam, and some big improvements to the oiling system. I’m looking for stout performance from Idle to 5000+ rpm, increased durability and ease of maintenance. On to the build:

Fitting the crank, getting ready to check main clearances:
AFFC91C4-F7B6-47E5-A0FA-CDE2798783E7.jpeg
AFFC91C4-F7B6-47E5-A0FA-CDE2798783E7.jpeg (62.58 KiB) Viewed 27788 times
Got the machine work done at Terry Walters in Roanoke and it is some of the nicest I’ve seen. Machine work included dip and clean the block, crank, and rods, check align bore on the mains, new cam bearings and freeze plugs, lightly hone the cylinders, check deck surface, turn the crank and recondition the rods.

Bottom end together:
AA1B7843-4AE3-43F5-B7C0-DF038E380EB8.jpeg
AA1B7843-4AE3-43F5-B7C0-DF038E380EB8.jpeg (72.56 KiB) Viewed 27788 times
Bottom end specs:
‘78 351w block .060 over, 363ci
Stock crank ground .020/.020 under, ARP main bolts
Stock C9 rods, ARP rod bolts
Speed pro flat top hyperutectic pistons, +12cc valve reliefs, running moly rings
Melling standard volume oil pump
.002 main clearance, .0015 rod clearance, .028 ring end gap, pistons .020 below deck surface

More to come...
'79 F-150
'49 CJ-3A
User avatar
VerticalTRX
Club President
Posts: 758
Joined: Wed Oct 26, 2005 12:51 pm
Location: Southwest VA
Contact:

Re: Off-road engine building 101

Post by VerticalTRX »

The top end consists of Edelbrock E-Street 170cc heads with 60cc chambers, Edelbrock Performer intake, Comp 1.6 roller rockers and as pictured a Crane 272H flat tappet cam (which I swapped out, more on that later.) I completely disassembled the heads and spent a few hours with a die grinder doing some port and bowl work, hand lapped the valves, checked all of machined surfaces, cleaned them good and reassembled. These heads were actually pretty good out of the box, but its always a good habit to tear them down and check and clean everything even if the mfg says they’re ‘ready to run.’ Unless you are buying CNC ported heads, a little hand work with the die grinder can really improve flow at all rpms.
9BA594C6-D111-4AE4-8940-5EB466E5004C.jpeg
9BA594C6-D111-4AE4-8940-5EB466E5004C.jpeg (78 KiB) Viewed 27776 times
Also pictured is the 7qt Canton deep sump oil pan. I really debated about this due to the price, but with the goal of ultimate durability and longevity in mind I think it was a wise decision. The new pan has baffles to keep oil in the pan at extreme angles and a crank scraper to reduce parasitic power loss and get oil back to the pan quicker, total system capacity is 8 qts.
9E706FAE-3E72-4814-896E-4B82FF85DA8A.jpeg
9E706FAE-3E72-4814-896E-4B82FF85DA8A.jpeg (65.24 KiB) Viewed 27776 times
More to come...
'79 F-150
'49 CJ-3A
User avatar
TerryD
Posts: 1905
Joined: Mon Sep 04, 2006 7:57 pm
Location: Covington, Va
Contact:

Re: Off-road engine building 101

Post by TerryD »

Looks good! Can't wait to hear it run!
Terry
Offroading: The hobby of turning perfectly good vehicles into scrap metal. :cool:
User avatar
VerticalTRX
Club President
Posts: 758
Joined: Wed Oct 26, 2005 12:51 pm
Location: Southwest VA
Contact:

Re: Off-road engine building 101

Post by VerticalTRX »

TerryD wrote: Tue Jul 21, 2020 9:21 am Looks good! Can't wait to hear it run!
Thanks man, it sounds really good :mrgreen:

Buttoned the motor up with Felpro rubber oil pan and valve cover gaskets with studs for leak free running and easy removal. Also reinstalled my 1 1/2” shorty headers (which turned out to be problematic), my Holley high flow mechanical fuel pump and a new Summit blueprinted HEI distributor:
B43AE481-1A1C-4A27-AE22-F33154D867A0.jpeg
B43AE481-1A1C-4A27-AE22-F33154D867A0.jpeg (71.16 KiB) Viewed 27757 times
9257520C-7C1C-4593-BFD8-9A618F474D53.jpeg
9257520C-7C1C-4593-BFD8-9A618F474D53.jpeg (70.17 KiB) Viewed 27757 times
Put the motor back in the truck, and it didn’t a want to start and when it did it only ran for a few seconds at a time. After lots of cranking (very bad for cam break-in) and fiddling I decided to quit while I was ahead before wiping the cam and sending metal through the motor. Turns out the carb spacer was warped creating a massive vacuum leak making it run extremely lean, but regardless I decided to swap the flat tappet cam for a roller cam. I was hesitant to run a roller cam due to several issue including the expense, but found one that should work for my setup. Installed a stock roller cam for a ‘87-93 5.0 mustang, its ground on a ductile iron core so my stock dist gear works, should be fairly gentle on the valvetrain, and has the specs I want at 210/211 duration at .050, .444 lift and 115* LSA. Duration is good, could use a little more lift, but the 115LSA and profile makes for a good idle, good vacuum, lots a of low and mid range torque and that sweet smooth yet aggressive sound of a 5.0 Fox. Pictured is new Howards link bar lifters, double roller timing chain, roller cam and comp 7.800” pushrods:
8CE7477A-BC6D-4F6F-B621-A4679A3A5DB7.jpeg
8CE7477A-BC6D-4F6F-B621-A4679A3A5DB7.jpeg (62.62 KiB) Viewed 27757 times
'79 F-150
'49 CJ-3A
User avatar
LcknHubs
Posts: 69
Joined: Mon Sep 11, 2017 9:42 am

Re: Off-road engine building 101

Post by LcknHubs »

Looks good Grubb, can't wait to hear that thing bounce off some rev limiters haha
1988 Toyota Pickup, Locked rear, 22r with Weber 38, 3 inch body lift on 33's, exclusive weight reduction bed (for more power) - Junk
1987 Toyota 4Runner - Junk
1986 Toyota 4Runner - Junk
1985 Toyota Pickup Crawler Build - Still will be Junk :flipoff2:
User avatar
VerticalTRX
Club President
Posts: 758
Joined: Wed Oct 26, 2005 12:51 pm
Location: Southwest VA
Contact:

Re: Off-road engine building 101

Post by VerticalTRX »

Yessir it sounds pretty good at 6 grand, can’t wait to sink it up to the doors in some good ol gumbo and see what it’ll do :mrgreen:
'79 F-150
'49 CJ-3A
Post Reply